
One of the most useful yet simplest ways to enhance Microsoft Azure governance is to assign tags to Azure resources or resource groups to track resource usage, ownership and application affinity. But tags become even more useful when they are used with Azure Policies, Azure Initiatives and Azure Management Groups.Another key point is that automation is an ongoing process that’s part of a continuous improvement strategy, not a one-and-done activity. The long-term goal is to move from manual labor to a futuristic world of self-adapting robots that take advantage of AI to drive continuous system optimization.
Besides helping you keep track of Azure resources, tags — which consist of a “Tag Name” and a “Tag Value” set — can help you manage access control and assign bulk Azure automation actions to resources with the same tag name, and can prove useful in cost management and budget control. When used with Azure Policies, you can also ensure that your resources are globally compliant with SLAs and company standards.
A policy enforces various rules and effects over resources. Policies are defined and then assigned to a certain scope, such as subscriptions. A group of related policies joined logically to accomplish a common goal is called an Azure initiative. If you have more than one policy defined around tagging, you can logically connect them into an initiative. You can then define a single set of parameters that are visible to all policies contained in the initiative.
Scope can also be defined to the initiative just once, instead of for each of the initiative’s policies. In a manner similar to the way Azure Initiatives contain related Azure Policies, Azure Management Groups logically group Azure subscriptions into containers. Any policies/initiatives applied to the management group will therefore be inherited by all the subscriptions it contains. In this paper we focus primarily on Azure Policies while also touching on Azure Initiatives and management groups.
Synergistically, these Azure governance tools can be used to ensure tags are always present for any resource or resource group when created, regardless of the mechanism used to provision the resource. To demonstrate how these tools can be used, we will define and assign a few tagging policies into an initiative and create a management group encompassing a few subscriptions.
The initiative will then be assigned to the management group, meaning that all the tagging policies in the initiative will apply to all of the subscriptions in the management group. You can quickly see the power and simplification of using a scheme like this to ensure that tagging is globally implemented.
Cost management use case
Our example will focus on tracking Azure costs by resource group. Azure customers want an exact tracking of their spending to help manage the costs of resources used in subscriptions. Cost management tools, such as Cloudyn (owned by Microsoft) and the native Azure cost management tools in Azure, make heavy use of tagging to provide costing information.
Regardless of the tool used, tagging is central to tallying costs. For instance, all the resources in the Production-01 subscription may have a tag of “Prod01.” This allows the cost management tools to search for all resources with the “Prod01” tag and sum their cost into the total for that tag. For each resource group, organizations tally the costs for all the resources that are a part of that specific group.
For the sake of brevity and to keep this article focused on tagging, we will not spend time on the cost management tools. Rather, we will discuss how to set up tagging to best allow those costing tools to function optimally.
Once the tagging architecture has been correctly designed, the cost management tools will adapt to make use of the tags.
Tag names
In our example, and for simplicity, we will define three tags as follows: DemoCostCenter, DemoDepartment and DemoProject. That means when any resource/resource group (R/RG) is created (regardless of whether it is provisioned via the Azure Portal, command-line interface, PowerShell or API), we want to ensure that each R/RG will automatically have those tags as part of its properties.
It is a good policy to make resource group tagging as similar as possible to the resource tagging to simplify design as well as implementation. You will see this later when we create policy parameters and share them among identically named tags for both resources and resource groups.
Management Group
To simplify the application of policies, we will use an Azure management group, then assign multiple subscriptions to that group. In turn, the management group is then defined as the scope for the initiative, which holds the policies.
This means all the policies contained in the initiative will apply to all the subscriptions defined in the management group. We first create an Azure management group. From within the Azure portal, bring up the management groups window and click on “Add management group.” Enter a name for the management group ID and the group display name. In this case, we enter DemoMgmtGroup.
Once the management group is created, open it and choose “+Add Subscription.” Add one or more subscriptions to the group via the user interface.
Policy
The first choice to make is which tagging policies to use. Microsoft is constantly adding new policies, so one way to find the latest available policies is to:
- Go into the Azure portal and in the “Search resources, services and docs” search box, type in “Policy.”
- Click on “Policy Definitions” to bring up a dialog that allows you to view available tagging definitions. There are four drop-down list boxes and a search panel.
- Under “Category,” click “Select All” to deselect all the options, then scroll down to the bottom and choose “Tags” to display only tagging policies, such as the following:
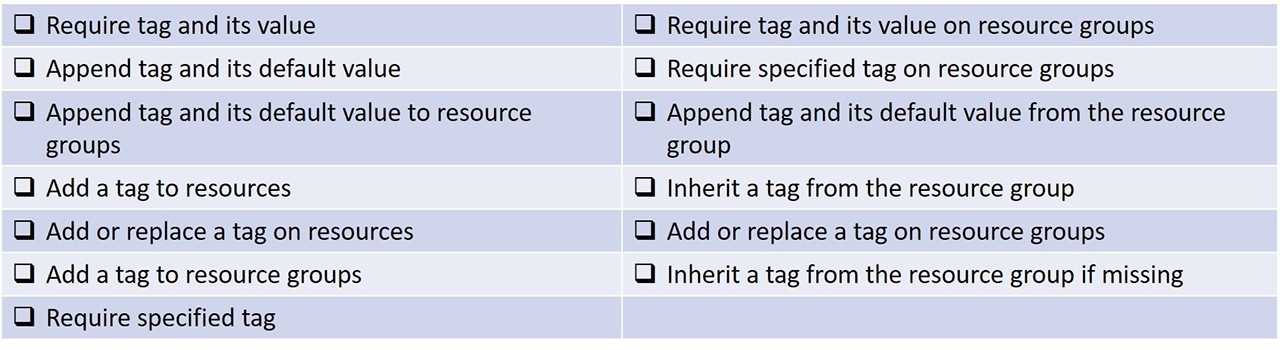
For our example, we choose to “Append tag and its default value.” Thus, when we provision or update a resource, it will append the specified tag and value to any resource that is missing this tag (for resource groups, we would use “Append tag and its default value to resource groups”.) A key point here is that a resource does not automatically inherit tags from its parent resource group. There is a policy to help with that, but it is not done automatically.
Initiatives With this done, we will now define an initiative with policies and create parameters that will be used in the tag name and value:
From the Policy — Definitions screen, choose “+Initiative Definition.”
- Click on the “Definition” location ellipses and choose the DemoMgmtGroup management group. (Do not choose the subscription that the management group is in, as the management group contains that.) Click “Select.”
- After entering a name for the initiative definition, under Category choose “Use existing” to choose the Azure built-in policies.
- In the drop-down list box, choose “Tags” at the bottom of the selections.
- In the “Available Definitions” screen, choose “Built-In Policy Definitions.”
- Enter “Tag” in the search box to show all the built-in tagging definitions.
- For each tag we are going to add, we need to select a policy instance. Therefore, since we are going to use “Append Tag and its default value” for three resource tags, we need three instances of that. Same for the resource group — three instances of “Append Tag and its default value to resource groups.” Click the “+” sign to the left of each policy to create an instance on the left-hand side.
- In the “Tag Name” field choose “Set Value,” and enter the name for the tag.
- In the “Tag Value” field, choose “Use Initiative Parameter.” In the value field, choose “Create Initiative Parameter.” The first time, it will put “TAGNAME_1” as the name.
- At the bottom of the screen, under “Initiative Parameters,” there is now a parameter named “TAGNAME_1.” Enter the display name (such as “DemoCostCenter”).
- In the “Allowed Values” field, you can create a list of values delimited by a semicolon for that field. For instance, since the first field will be DemoCostCenter, you can put a list of all the cost centers you want to show up in the list box. It is important to note that this will not restrict the values that can be entered in that box, as the user can type anything at the end — for example, “CC1456;CC2235;CC687.”
- Back up top in the “Tag Value” field, put in a default value that will show up when this tag is created (such as CC1456). Again, that can be changed, as any value can be typed in when values are actually assigned.
- Repeat this for the other two resource tags, DemoDepartment and DemoProject. In this example we have decided to use the same set of tags for both the resources and the resource group. We can leverage the work we just did and use the same parameters for the resource groups under the “Add tag and its default value to resource groups” policies.
- Once we define the initiative, we assign it to a subscription. Or we can use an Azure management group, which can encapsulate multiple subscriptions. Go back one level and click on “Assign Initiative.” Since we already chose the definition location of DemoMgmtGroup management group when creating the initiative, that is filled in by default for the scope.
- Click on “Parameters.” Here is where you can view the semicolon-delimited values you entered previously to select default values that will be used.
- After making choices, click “Create.”
- Under “Policy - Assignments,” you should now see the DemoInitiative initiative assigned to the DemoMgmtGroup management group.
Testing the policies
- Go into the Azure portal and create a resource group.
- Open it and look at the “Tags” properties. You will see the three tags and the default values that were created by the policies contained in the initiative, which was assigned to the management group that scopes one or more subscriptions.
- Do the same for any resource, and you will see the same results.
You can modify the default values by clicking on the drop-down list box and typing in a value or by choosing a selection from the drop-down list. Note that the selections for the actual instances of resources or resource groups will have various existing entries in the list drop-down. This is cached data that is stored at a level above the initiative. It’s a combination of all the entries that have been entered or chosen to date. The list of values separated by a semicolon that we specified in the initiative parameter definition is not created for this list box, but rather, when we are assigning the initiative definition to a management group or a subscription.
Cost management As mentioned previously, we are not going to spend much time on cost/budget management tools; but here’s a quick way to see how tagging supports cost management:
- Bring up the “Cost Management” screen and click on “Cost Analysis.”
- Choose the subscription(s) for the scope.
- Select one of the built-in views (Accumulated Costs, Cost by Resource, Daily Costs, etc.)
- For the filter, select “Tag.”
- Choose a common tag such as “Department.” (Note: You need to define and have that tag assigned, before this will work.)
You will then see the cost information displayed. You can adjust the settings to tune it to the information you want to see. Using consistent and correct tags and ensuring all your R/RGs have those values will make this process a lot easier and, more importantly, make the data more useful and correct. Azure cost management tools also will leverage tagging, with the result being only as good as the tagging scheme upon which it is based.
Best practices
As tagging can get very complex, try to maintain consistency across all tags used in resources and resource groups. Specifically, this means preserving a consistent taxonomy in the following areas:
- Consistent number of tags for all R/RGs. This way, any tools that query certain tag values can ensure that no matter which R/RG is reviewed, it will consistently have the same number of tags.
- Consistency across tag names. For instance, use one tag called “ApplicationContacts” for all the resources, and avoid tags such as “App” or “AppContacts” having the same semantic meaning but different names, which can lead to incorrect cost-management tracking.
- Rules about abbreviations and spelling for the tags. Not having these rules really limits the effectiveness of the tags and generated reports.
- Consistency across tag values. If a department name with an alphabetic character is required in the first space, a valid tag would be D7011. There should not be inconsistent values such as D-7011 or D:7011 in the data.
- Tags that are common to all resources and resource groups. For instance, items such as “Owner” to show who owns the resource. Others can include Application, Project, Environment (Dev, Test, Prod, etc.) Depending upon how much you want to control the use of tagging, there are policies you can use to ensure that tags cannot be changed from their default values or be deleted.
Azure tags use a name:value pair to help you organize and track your resources and their usage. This helps cost management programs in Azure to better and more reliably track these items through their life cycle. The many benefits of an effective governance design are greatly increased via tagging. We created an Azure initiative encompassing various Azure tagging policies. The combined policy usage ensures that every time a resource or resource group is created, a set of specific tags and default values will be assigned to it. Once you get a tagging system in place that is reliable and consistent, you can integrate with Azure costing tools to micromanage your cost.